Learn how to import users and a reporting hierarchy into CompetencyCore directly from an HRIS or Excel spreadsheet
In this article:
- Step 1. Decide how to map positions to job titles
- Step 2. Create or export a file
- Step 3. Import the file
- Step 4. Map fields to column headers
- Step 5. Review errors
- Step 6. Select options
- Step 7. Complete the import
- Step 8. Review the import
- Step 9. Set passwords and enable users
Depending on the size of your organization, it can take a long time to manually create CompetencyCore accounts for your employees and set up the reporting hierarchy. The Organization Importer allows you to import this data directly from an HRIS or Excel spreadsheet. You can choose which column in your import file is used to populate each of the account fields in CompetencyCore. This option is a great time-saver when you’re setting up your site or making updates to contact details and reporting relationships.
Step 1. Decide how to map positions to job titles
In CompetencyCore, we use positions to link users to jobs. Typically, each employee fills one position. If multiple employees are performing the same role, we create a position for each and associate all of those positions to one job. Positions are auto-created for each employee and linked to the corresponding job in your site through the import process. There are two options for how these associations are made.
Warning: Make sure your job descriptions are published. Draft jobs can’t be linked to positions through the import.
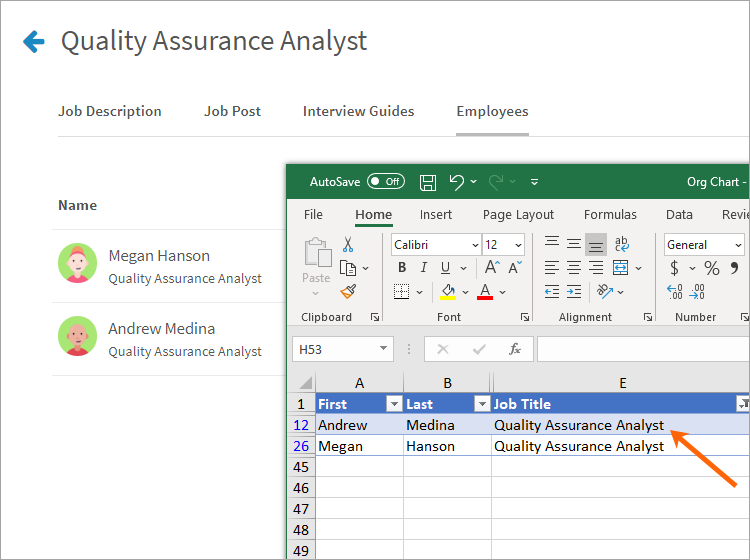
Option 1: Match to jobs (default)
We use the position name to find a matching job. This means that your position names need to be an exact match to your job titles in CompetencyCore.
- Keep in mind that the org import is case sensitive.
- Double check that the spelling is correct.
- Don’t leave trailing spaces.
- Don’t treat “and” and “&“ as the same.
Note: Jobs are never auto-created. The positions that are auto-created through the import are only associated to a job if a match exists in your CompetencyCore site.
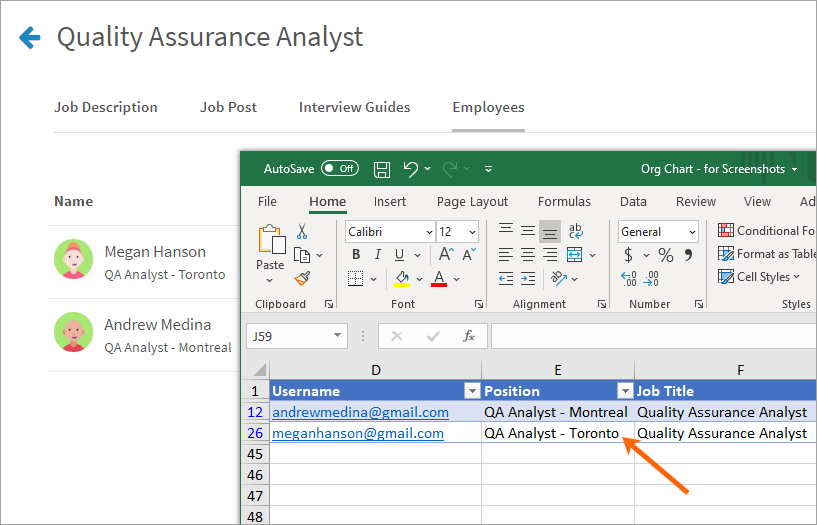
Option 2: Create unique position names
To create unique position names, include a separate “Job Title” column in your file. Positions will be associated to the job identified in this column. Job titles need to be an exact match to jobs in CompetencyCore, but positions can be named whatever you’d like. For example, our three HR managers can now be identified by their location, but all three will still be mapped to the HR Manager job.
- Click the gear icon on the top right of your screen.
- Click Settings in the Administration menu.
- Click Site under General Settings in the side menu.
- Turn on the Include job titles setting and click Save.
Step 2. Create or export a file
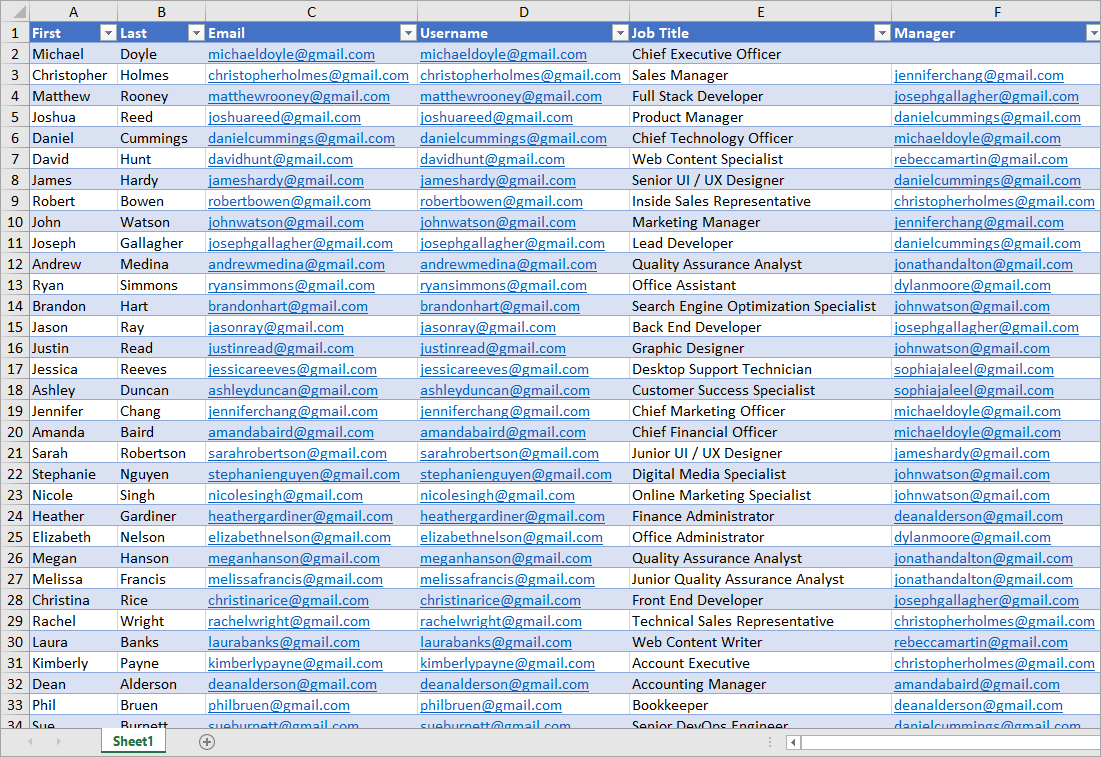
Create a new file in Excel and add headers for each of the fields below. See the full list for more details. Fill in each column with your user data OR export an excel file from your HRIS system.
- First name
- Last name
- Email address
- Username
- Position (job title)
- Manager (identified either by their employee ID number or by their email address)
Step 3. Import the file
- Click the gear icon on the top right of your screen.
- Expand User Management in the Administration menu and click Users.
- Click Add on the top right of the page and select Organization Import.
- Click Select File and select a CSV file to import.
- Check the number of users identified and click Continue.
Warning: For each import, make sure the file includes ALL active users. Users not included will be unassigned from their position. Positions not included will be left vacant and will no longer part be of the reporting hierarchy in your organization.
Step 4. Map fields to column headers
Select a column header to map to each required field.
Required
- First name: Will be updated on subsequent imports.
- Last name: Will be updated on subsequent imports.
- Username: Cannot be updated via the import. Each entry in this column needs to be unique.
- Email: Cannot be updated via the import. Each entry in this column needs to be unique.
- Position: If the position is changed, the user is unassigned from their current position and assigned to a new position.
- Manager Email (or ID): Some rows can be left blank because users like the CEO might not have a manager. Identify the manager either by their email or their employee ID. If by employee ID, that field becomes required.
Required depending on setup
- Employee ID: Required if this field is being used to identify managers. Will be updated on subsequent imports. Each entry in this column needs to be unique.
- Job title: Required if the Include job titles setting is turned on. If the position is changed, the associated position is removed from the current job and associated to the new job.
Optional
- Country: Will be updated on subsequent imports.
- City: Will be updated on subsequent imports.
- Hire date: Will be updated on subsequent imports. If the field is left blank, the original value is not overwritten.
- Hire date format: Required if you’re importing the hire date. Select the format of dates in your file. All dates will be formatted as YYYY-MM-DD once imported in CompetencyCore.
- Department: If the field is changed, the position is removed from their current department and added to the new department. If the field is left blank, the position is removed from all departments.
- User group: If the field is changed, the user is removed from their current group and added to the new group. If the field is left blank, the user is removed from all groups.
Note: A user can be added to multiple departments and user groups directly in CompetencyCore, but can only be added to one through the org import.
Step 5. Review errors
Refer to the list of potential errors for more information. Click View errors to download a text file identifying empty or duplicate rows. Correct any errors and re-upload.
- Wrong format or size: Make sure the file is saved as a CSV that’s no larger than 5Mb.
- No column headers: Make sure the file includes column headers so they can be mapped to CompetencyCore fields.
- Missing required fields: All required fields need to be mapped to a column.
- Column mapped to multiple fields: Make sure that each column is only mapped to one field. The exception is username and email, which can be mapped to the same column.
- Duplicate fields: Make sure there are no duplicate usernames, email addresses, or employee IDs in your file.
- Empty fields: Make sure there are no empty fields in columns mapped to a required field.
- Countries not identified: Make sure country names or codes match our list in CompetencyCore (see full list). If you proceed without fixing this error, the country field is left blank.
- Mismatch: The import cannot proceed if there are commas in your file that are not used as field separators. This is a rare case that only occurs if commas are added in a text editor.
Step 6. Select options
- Disable users not included in this import: Users with permission to Manage Accounts are not disabled so you can’t be locked out of your account.
- Send activation emails to new users: They receive an email with their username and a link to set their password. You can also send activation emails after the import (see step 9).
Note: The administrator cannot set passwords manually through the import, but they can set passwords for users as a bulk action following the import (see step 9).
Step 7. Complete the import
Click Import. You’ll receive an email once the import is complete. The time it takes to complete depends on the file size. For example, an import of 200 users takes between 5 and 20 minutes.
Step 8. Review the import
Click the link in your email to open the Import Log and review the import details. You’ll be provided with the number of new users, positions, departments, and teams that were auto-created as part of the import. The number of new associations created between users, positions, and jobs is also recorded so you’re aware of exactly how your import file was processed in CompetencyCore.
- Click the gear icon on the top right of your screen.
- Expand User Management in the Administration menu and select Users.
- Click the 3-dot icon on the top right of the page and select Import Logs.
- Click the import date to open a summary of imported users and associations.
- Point to an import and click the 3-dot icon on the right side of the page.
- View Import Data: Downloads a CSV file of the imported data.
- View Processing Log: Downloads a text file of the import processing details.
Step 9. Set passwords and enable users
New users are imported as disabled. If you selected the option to send activation emails in step 6, users will be automatically enabled as they set their passwords. If you have not sent activation emails through the import, you can set passwords and enable users after the import.
- Click the gear icon on the top right of your screen.
- To view imported users, click the filters icon and select Disabled.
- Select today’s date in both of the Users added between filters.
- Select the checkbox at the top of list beside the User label to bulk-select the list of users.
- Click Actions and select Send Password Link or Set Password. If you don’t see the option to set passwords, click Settings in the Administration menu, select Security under General Settings in the side menu, turn on the Set passwords setting, and click Save.
- Send Password Link: Click OK to confirm. Accounts are enabled as passwords are set.
- Set Password: Enter a password, select Enable disabled accounts, and click Submit.