Understand how validation affects user profiles and learn how to set up validation for competencies or other library types
In this article:
How validation works
CompetencyCore gives you the flexibility of choosing whether users can self-declare qualifications or whether they need to first request validation by their manager. This decision can be different for each library type. You might allow employees to self-declare their education, but implement a validation process for the competencies they want to add to their profile.
Warning: Items added to profile before validation is turned on will require validation (unless a manager gave approval through an assessment or challenge rating), so it’s important to make a decision before users start adding to their profiles.
If validation is turned off…
- A user adds an item to their profile or completes a challenge.
- The user’s profile completion increases.
- The item contributes to job matching.
- Managers see this item as a strength from Team.
If validation is turned on…
- A user adds an item to their profile or completes a challenge and requests validation.
- While awaiting validation, the item is added to their profile.
- The user’s profile completion increases.
- The item might contribute to job matching depending on what’s selected in step 2.
- Managers see the item as a strength or a gap from Team depending on step 2.
Note: In assessments where a manager is involved, competencies marked as strengths are added to the subject’s profile as already validated. This also applies when a manager marks their employee’s challenge as done.
Setting up validation
Follow the steps below if you want to implement a validation process for any library type.
Step 1. Turn on validation
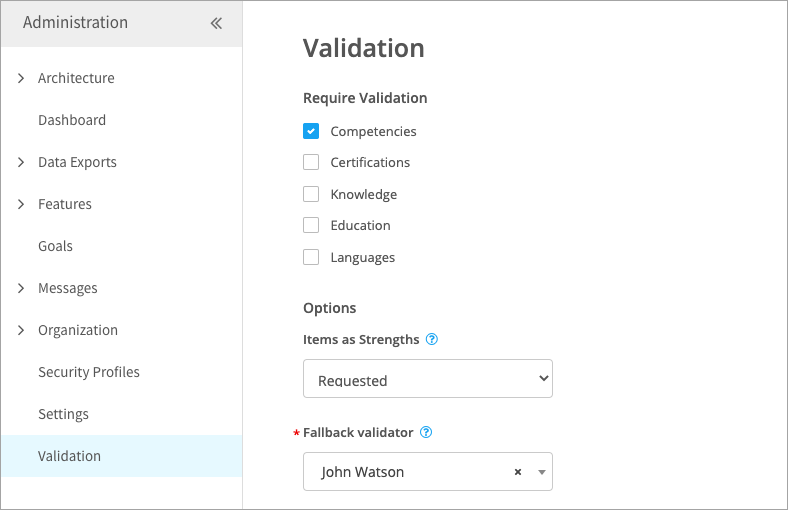
Validation is turned off by default for all library types. Turning on validation makes it mandatory; turning it off removes the validation feature entirely.
- Click the gear icon on the top right of your screen.
- Click Validation in the Administration menu.
- Select the Validation checkbox to implement validation.
- Click Save at the bottom of the page.
Step 2. Decide if validation is required for job matches
- Click the gear icon on the top right of your screen.
- Click Validation in the Administration menu.
- Leave Requested selected in the Items as Strengths setting if you want items that have been requested but not yet validated to contribute to job matching.
- Select Validated to restrict job match scores to validated items and click Save.
Tip: Select Requested if you want to give your employees more freedom to see job matches and build a career path without waiting for a response from their manager.
Step 3. Choose a fallback validator
Validation requests are sent to a user’s manager. You can select a fallback user who acts as validator in cases where a user doesn’t have a manager.
- Click the gear icon on the top right of your screen.
- Click Validation in the Administration menu.
- Select a Fallback validator and click Save.

