Learn how to send out a job description for validation so you can collect input from others in your organization
In this article:
- About job validation
- Choosing an approval process
- Sending jobs for validation
- Accessing validation surveys
- Editing survey properties and participants
- Sending reminders to complete the survey
- Archiving or deleting a validation survey
- Viewing a job’s validation history
About job validation
Build effective job descriptions by collecting input from a variety of stakeholders. Before publishing a job, you can send it off for review to your choice of contributors who provide feedback on the summary, competencies, responsibilities, and other job requirements. You can designate a reviewer who will make final decisions based on the feedback they receive and update the job description with the results.
Choosing an approval process
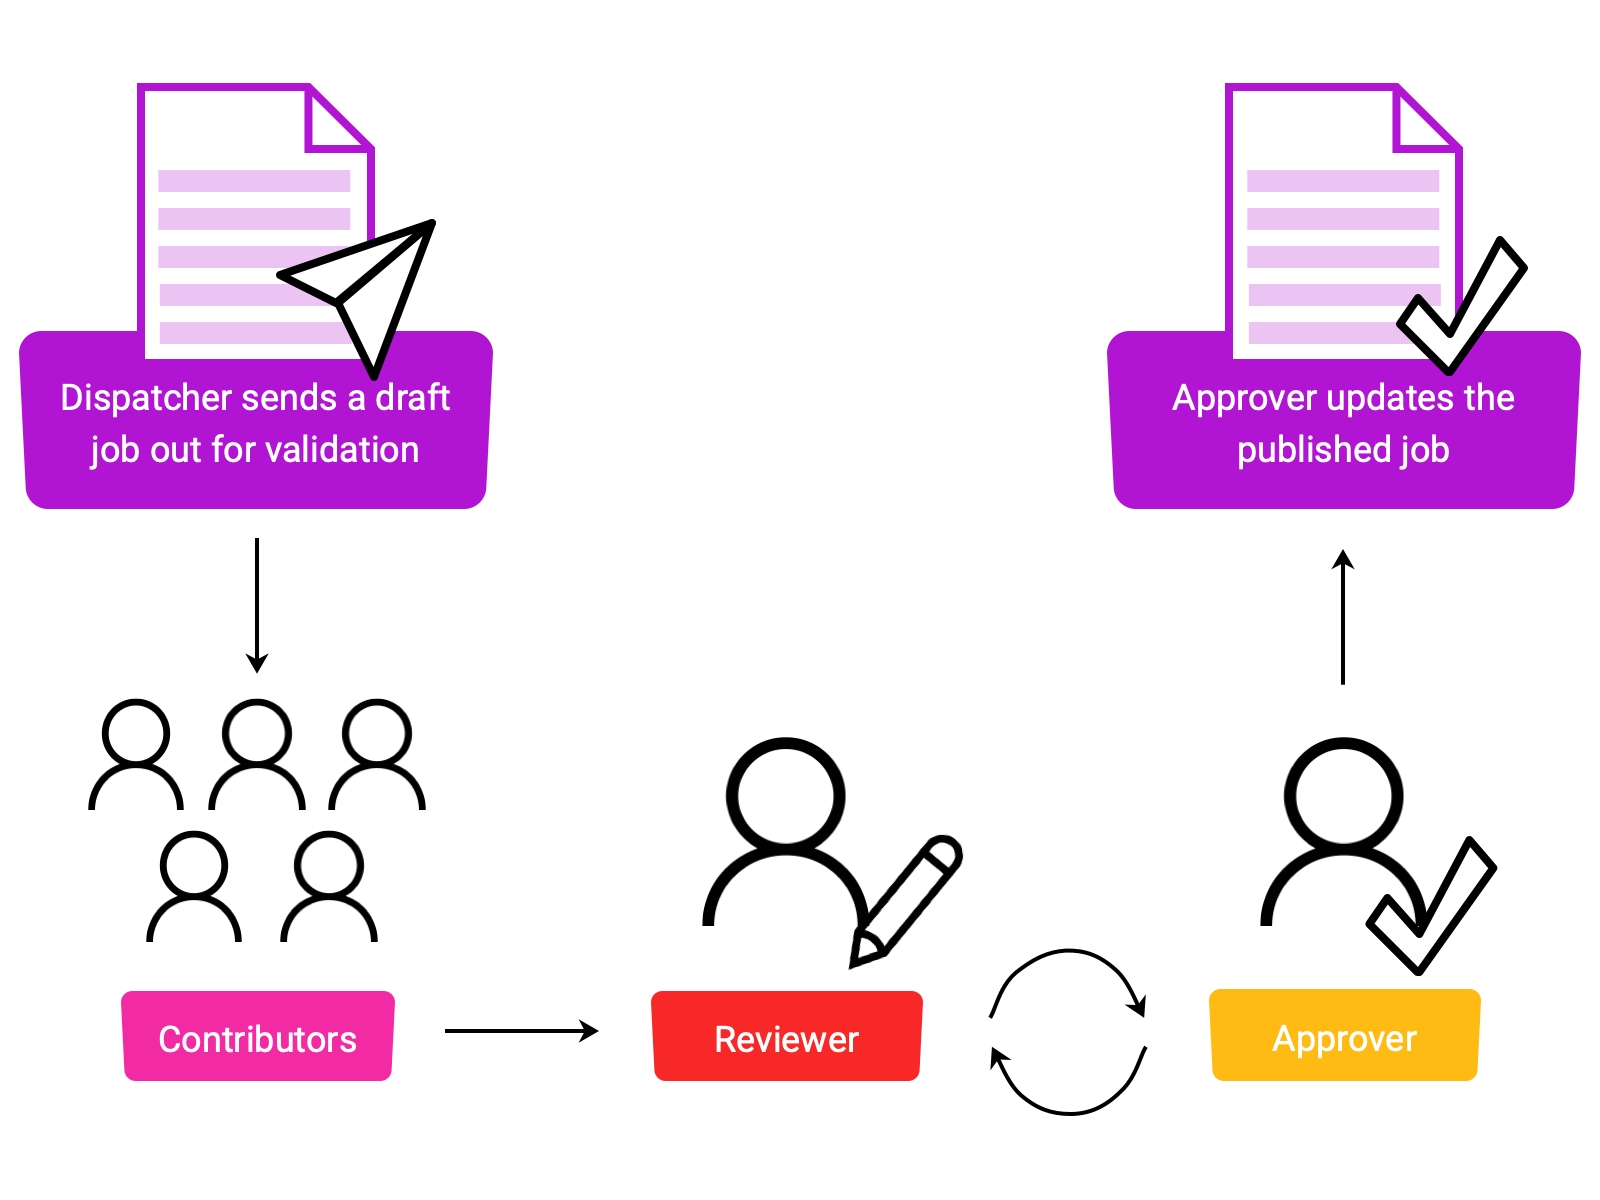
By default, validation involves multiple contributors and one reviewer. You can add another stage of approval by including an approver who has the final say on the job description. The job can be sent back and forth between the reviewer and approver before the approver publishes the job.
To include an approver
- Click the gear icon on the top right of your screen.
- Click Settings in the Administration menu.
- Click Jobs under CompetencyCore in the side menu.
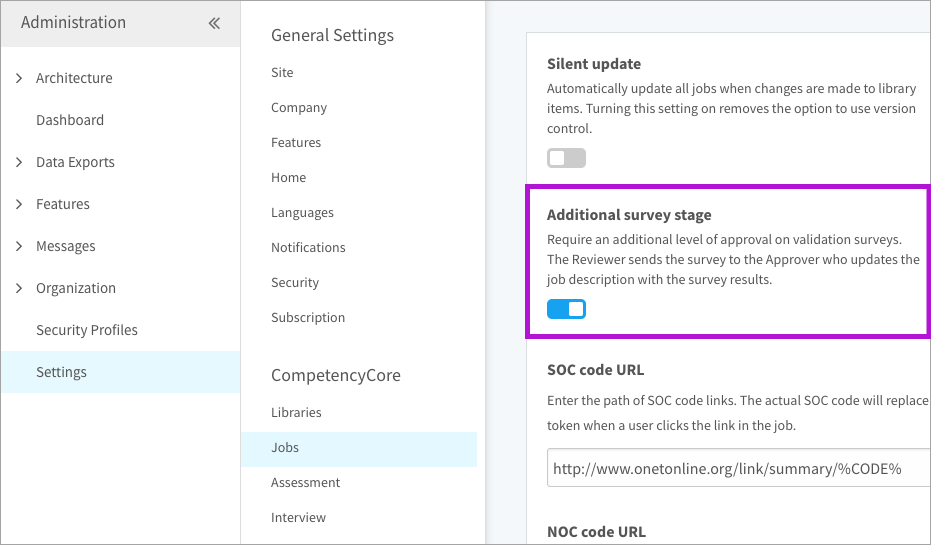
- Turn on the Additional survey stage setting.
- Scroll to the bottom of the page and click Save.
Sending jobs for validation
Follow the steps below to send a job out for validation from the Validations page. You can also select Validate from the actions when you’re viewing a draft job. If you don’t see this option, ask your administrator to turn on the Create Validation Survey permission.
To create a validation survey
- Navigate to Content > Jobs.
- Click Menu on the top right of the page.
- Select Manage Validations in the drop-down.
- Click Create on the top right of the page.
- Search for and select jobs you want to validate. A separate validation survey will be created for each job. Jobs already out for validation can’t be selected. Click Next.
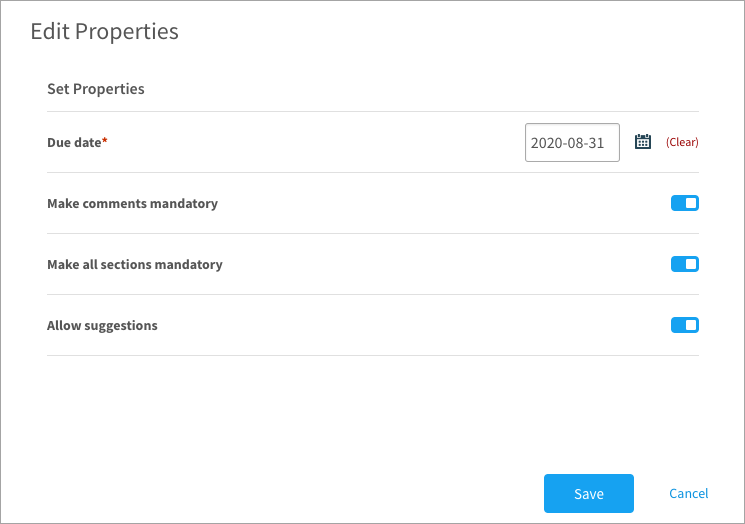
- Click the calendar icon to select a due date for the contributors.
- Select an option for each of the settings and click Next.
- Make comments mandatory: Disagreeing with the job summary or a library item prompts the contributor to provide a rationale. Turn this setting on to make rationale mandatory.
- Make all sections mandatory: If this setting is turned on, contributors need to respond to each library item before they can submit. This only applies to the original library items, not suggestions made by other contributors. If this setting is turned off, contributors only need to enter a response for the summary and at least one library item.
- Allow suggestions: Participants can choose a new item to suggest from all items on the site. If this setting is turned on, library sections that you’ve left empty appear so participants can make suggestions.
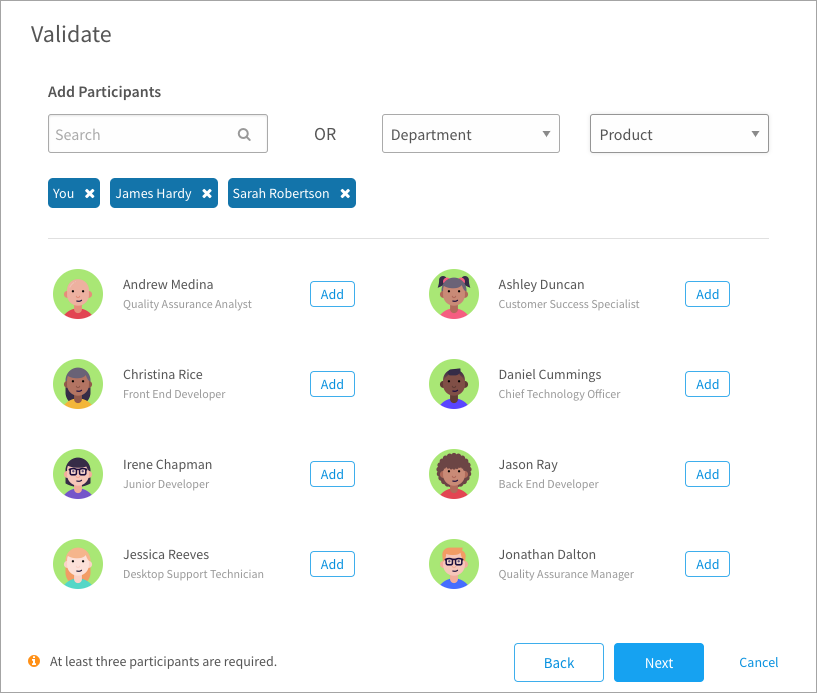
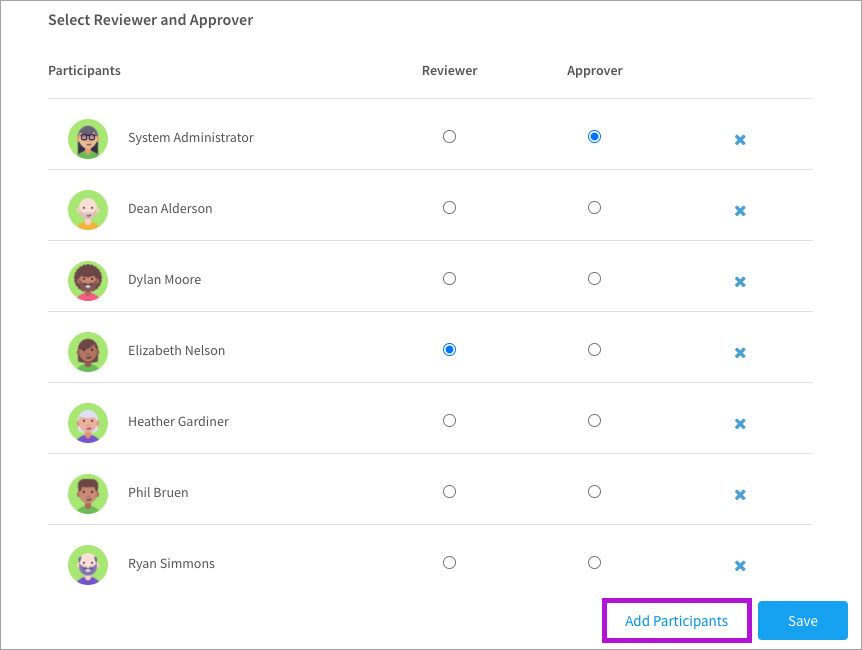
- Search or select from suggested users and their managers. Click Next.
- Select one reviewer. If you’re using the 3-step process, select an approver as well.
- Click Save or Send.
To send a saved survey to participants
Clicking Save instead of Send when you set up validation allows you to continue editing the draft job before it’s sent out. Once it’s ready to go, you can send the job to participants from the Validations table.
- Navigate to Content > Jobs.
- Click Menu on the top right of the page.
- Select Manage Validations in the drop-down.
- Select Setup in the Stage filter.
- Select the surveys you want to send out.
- Click Actions and select Send.
- Click OK to confirm. The contributors and reviewer receive a notification to validate the job.
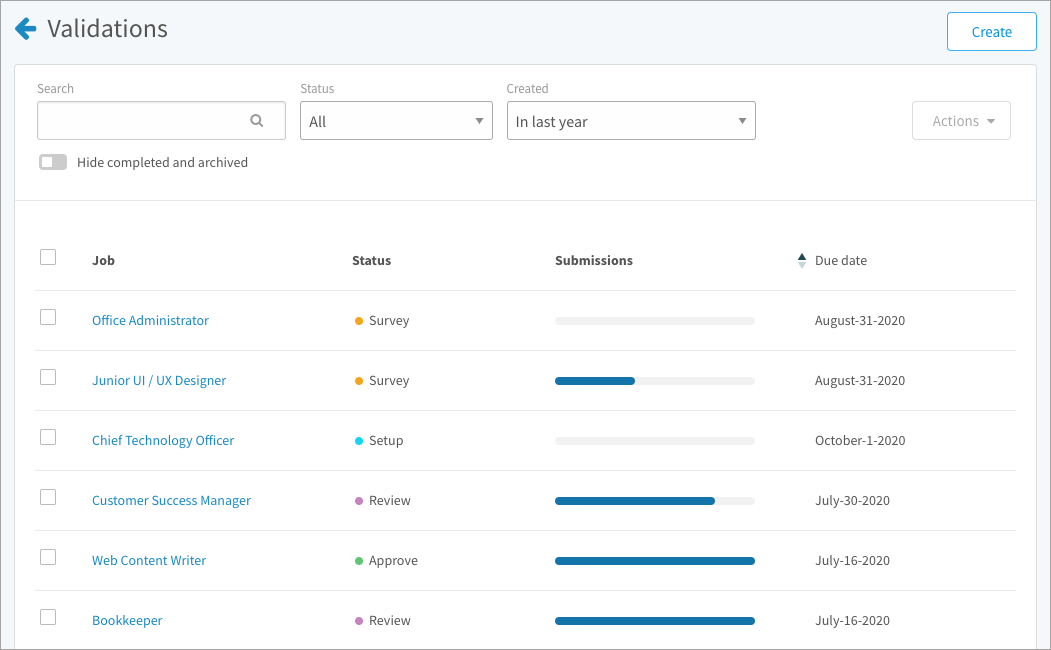
Accessing validation surveys
The Validations table displays all of the jobs you’ve sent out or saved for validation. To view validation sent by other users, ask your administrator to turn on the Validation Surveys Administrator permission.
To filter validations by status
- Navigate to Content > Jobs.
- Click Menu on the top right of the page.
- Select Manage Validations in the drop-down.
- Search for a job or filter by status:
- Setup: The job and properties are selected but not sent out to participants.
- Survey: The job is sent to contributors who are submitting their responses.
- Review: The reviewer closed the survey and is approving the survey
- Approve: The reviewer sent the job to the approver who is going through a final review.
- Complete: The job is published.
- Archived: The submissions are saved in the archived survey but not published.
Click a job title to view the feedback and comments from contributors. Unless you’re also the reviewer, these responses are read-only.
Editing survey properties and participants
To edit the due date or properties
If the survey has already bene sent, changes apply going forward for remaining submissions.
- Navigate to Content > Jobs.
- Click Menu on the top right of the page.
- Select Manage Validations in the drop-down.
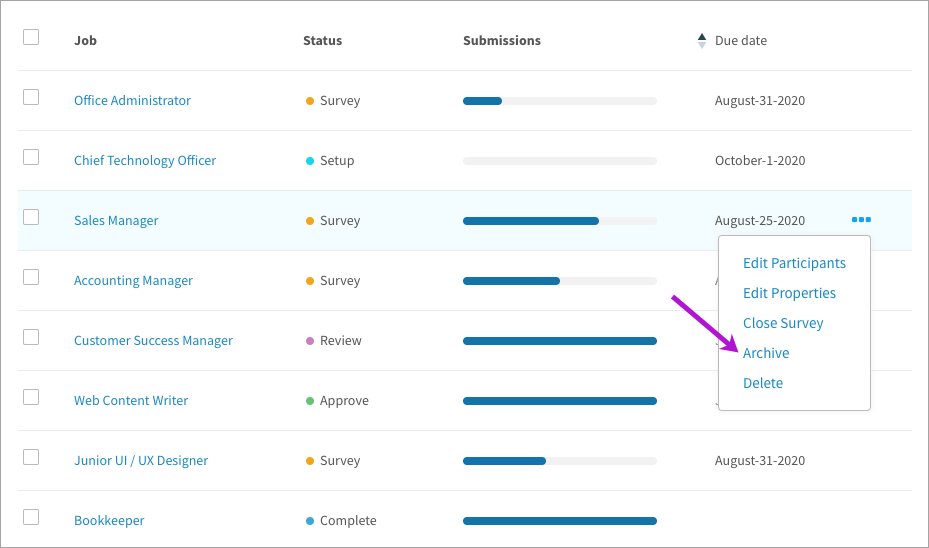
- Point to a survey, click the 3-dot icon, and select Edit Properties.
- Change the due date or settings and click Save.
To add participants
- Navigate to Content > Jobs.
- Click Menu on the top right of the page.
- Select Manage Validations in the drop-down.
- Point to a survey, click the 3-dot icon, and select Edit Participants.
- Click Add Participants on the bottom right of the window.
- Search or select from suggested users and their managers. Click Save.
- Review the updated list of participants and click Save.
To remove participants
The survey submissions of deleted participants will also be deleted.
- Navigate to Content > Jobs.
- Click Menu on the top right of the page.
- Select Manage Validations in the drop-down.
- Point to a survey, click the 3-dot icon, and select Edit Participants.
- Click the x icon to remove a participant and click OK to confirm.
- If you’ve removed the reviewer or the approver, select other users to fill these roles. If the selected users were previously contributors, their submissions as contributors are deleted because the same participant can’t be both a contributor and a reviewer or approver.
Sending reminders to complete the survey
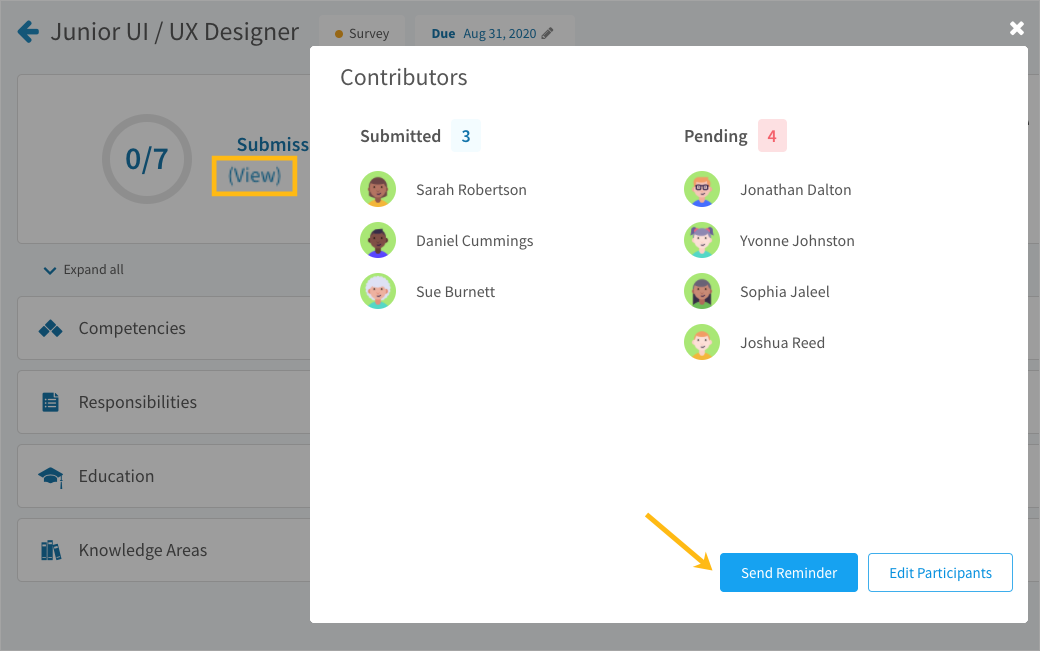
Contributors receive a notification when you send out a job for validation, but you can also send reminders. Hover over the Submissions progress bar on the Validations table to see how many contributors have submitted responses. You can click the number in the tool tip to open a detailed list. To send reminders to contributors whose submission is still pending, follow the instructions below.
To send reminders for one job
- Navigate to Content > Jobs.
- Click Menu on the top right of the page.
- Select Manage Validations in the drop-down.
- Click a job title in the Validations table.
- Click View below the Submissions heading.
- Click Send Reminder. All pending contributors receive a reminder email.
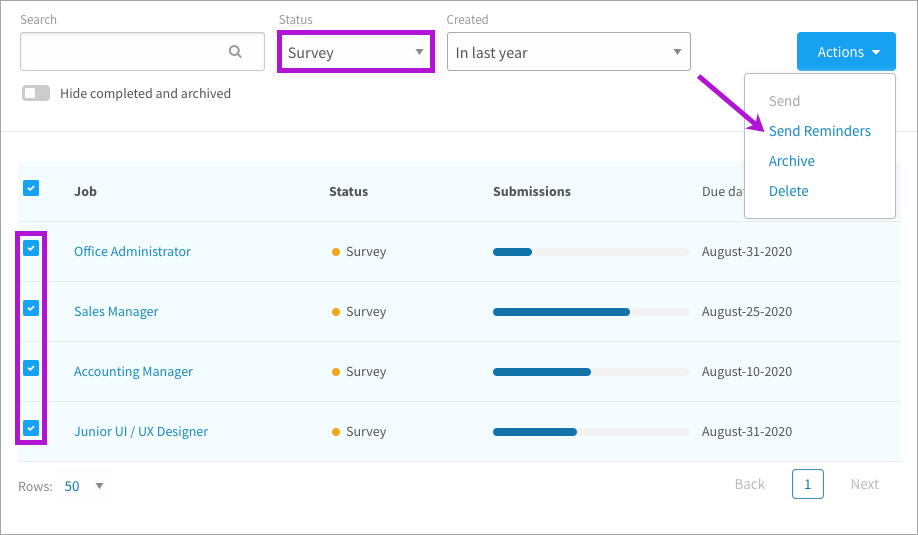
To send reminders in bulk
- Navigate to Content > Jobs.
- Click Menu on the top right of the page.
- Select Manage Validations in the drop-down.
- Select Survey in the Stage filter.
- Select the surveys you want to include.
- Click Actions and select Send Reminders.
- Click OK to confirm. All pending contributors receive a reminder email.
Archiving or deleting a validation survey
To archive a validation survey
You can archive validation in the survey, review, or approve stage. Archiving closes the validation and saves the draft job with any updates. This allows you to keep a copy of the validation task without publishing or deleting the input. Archived validations cannot be re-opened.
- Navigate to Content > Jobs.
- Click Menu on the top right of the page.
- Select Manage Validations in the drop-down.
- Select the surveys you want to archive.
- Click Actions and select Archive.
- Click OK to confirm. All selected validations except those in the Setup stage are archived. Participants are notified that the validation has been archived.
To delete a validation survey
You can delete validation in the setup, survey, review, or approve stage. The draft job is saved with any updates, but you’ll lose all of the comments from participants. If you want to delete a completed or archived survey, contact your Client Success Specialist at HRSG to enable this permission on your site.
- Navigate to Content > Jobs.
- Click Menu on the top right of the page.
- Select Manage Validations in the drop-down.
- Select the surveys you want to archive.
- Click Actions and select Delete.
- Click OK to confirm. All participants submissions will also be deleted.
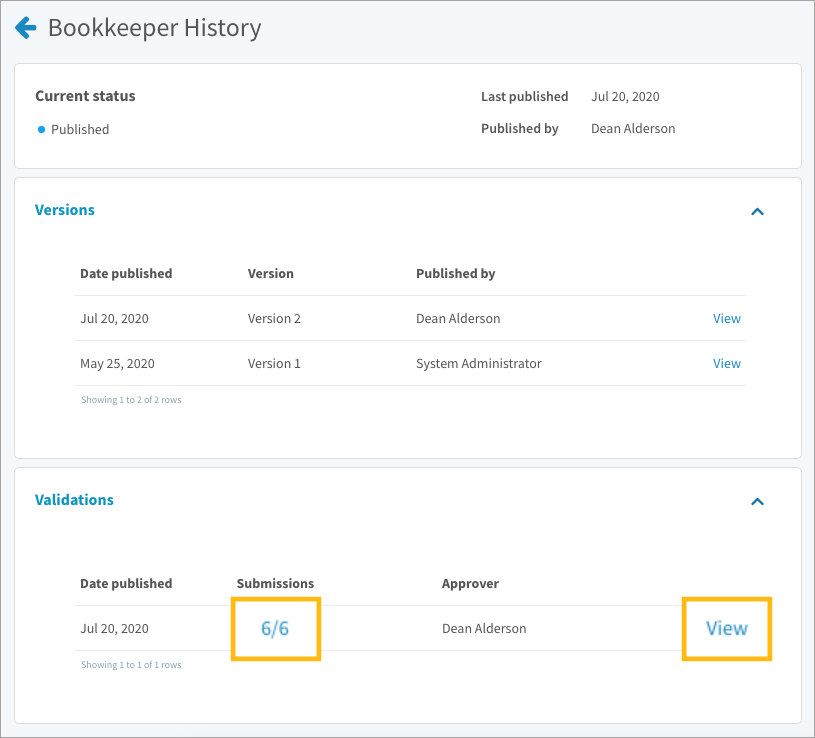
Viewing a job’s validation history
When results are published, a new version of the job replaces the current version. A job’s history allows you to view previous versions and access completed validations. You can see the date validation was published, the number of contributors, and the user who made the final approval.
- Navigate to Content > Jobs.
- Click a job title in the Jobs table.
- Click the 3-dot icon on the top right of the page.
- Select View History in the drop-down.
- Click the number of submissions to view a open a list of participants.
- Click the View link to open the survey.